10 Fun Halloween Art and Craft DIY Projects to Thrill Kids
- Hannah Jane Pierce

- Oct 20, 2025
- 10 min read
As Halloween approaches, it's the perfect time to engage kids in creative activities that spark their imagination and bring the spirit of the season to life. Crafting not only allows children to express themselves but also helps develop fine motor skills and encourages teamwork. Here are ten exciting Halloween art and craft DIY projects that are sure to thrill kids of all ages!
Handprint Ghosts
Simple, sweet, and a total hit with little ones — Handprint Ghosts are one of those timeless Halloween crafts that blend creativity, learning, and giggles! This spooky-yet-cute activity turns your child’s handprint into a floating ghost friend, giving them a keepsake they’ll love showing off.

What You’ll Need:
White cardstock or construction paper
Pencil for tracing
Scissors (child-safe)
Googly eyes (or draw your own with markers!)
Black marker or crayon for the mouth
Glue stick or tape
String or yarn (optional, for hanging the ghosts)
Hole punch (optional)
How to Make It:
Trace Those Tiny Hands! Have each child place their hand on the white paper and carefully trace around it. Encourage them to spread their fingers slightly — the more wiggly, the more “floaty” the ghost will look!
Cut It Out: Use scissors to cut along the traced lines. For younger children, grown-ups can assist, but let little ones try cutting simple sections — it’s great scissor practice.
Bring Your Ghost to Life: Flip the handprint upside down so the fingers become the ghost’s wavy bottom and the palm becomes the head. Glue on two googly eyes and draw a happy (or spooky!) mouth.
Optional – Make a Ghost Parade: Punch a small hole at the top and thread a string through to hang your ghost. Soon, you’ll have a room full of fluttering friendly spirits!
Paper Plate Pumpkins
Bring a little Halloween magic to life with Paper Plate Pumpkins! This timeless craft is perfect for toddlers and preschoolers, offering a balance of creativity, fine motor skill practice, and collaborative fun. Children can paint, cut, and decorate their pumpkins, creating individual masterpieces or a whole classroom pumpkin patch.

What You’ll Need:
Paper plates (standard size)
Orange paint or markers/crayons
Black construction paper or cardstock
Glue stick or liquid glue
Scissors (child-safe)
Green pipe cleaners or construction paper for stems
Optional extras: glitter, tissue paper, pom-poms, or stickers for decoration
How to Make It:
Paint or Color the Plate:
Cover the entire front of the paper plate with orange paint.
For younger kids, pre-paint plates or allow them to color with markers.
Let the paint dry completely before moving on to decorating.
Cut Out Facial Features:
Cut out triangles for the eyes and a jagged mouth from black paper.
Encourage kids to make their pumpkin silly, scary, or goofy — there’s no right or wrong expression!
Glue on the Face:
Position the eyes and mouth on the plate and glue them down.
For extra engagement, allow kids to add glitter, stickers, or tissue paper pieces.
Add a 3D Stem:
Twist a green pipe cleaner and attach it to the top of the plate for a realistic, playful stem.
Alternatively, roll a small piece of green paper into a stem and glue it in place.
Create a Pumpkin Patch Display:
Once complete, hang the pumpkins on a wall, string them together for a banner, or arrange them on a table to create a collaborative pumpkin patch.
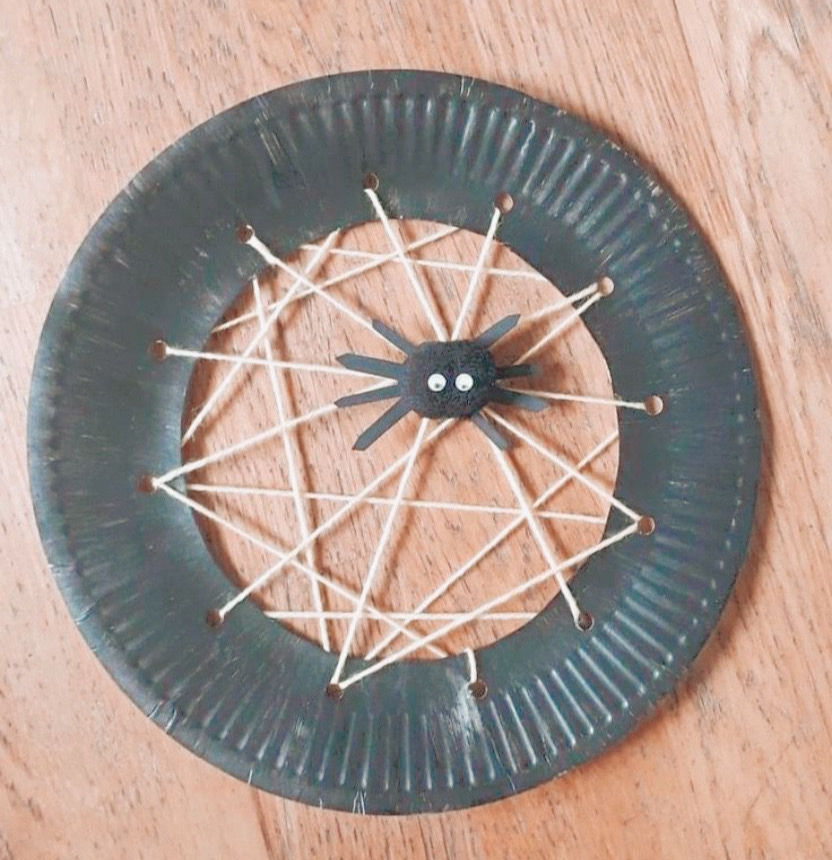
Spider Web Yarn Art
Bring a little spooky magic to your Halloween activities with Spider Web Yarn Art! This craft combines tactile fun, fine motor development, and a touch of science as children explore the structure of spider webs. It’s hands-on, visually striking, and perfect for toddlers, preschoolers, and early years classrooms.
What You’ll Need:
Black paper plates, cardstock, or construction paper (serves as the web base)
White yarn, string, or thin ribbon (for threading the web)
Hole punch (or pre-punched paper for younger children)
Plastic spiders or spider stickers
Scissors (child-safe)
Optional extras: glitter, small beads, or sequins to decorate the web
How to Make It:
Prepare the Web Base:
Take a black paper plate or cut a circle from black cardstock.
Use a hole punch to create evenly spaced holes around the edge of the circle. This will be the starting point for the web threads.
Thread the Web:
Tie one end of the yarn to a hole to anchor it.
Guide children to thread the yarn from hole to hole across the plate, creating intersecting lines to mimic a spider’s web.
Encourage different patterns — radial (from the center out) or zig-zagging across — letting their creativity guide them.
Add Creepy Crawly Details:
Attach a plastic spider on the web with tape or glue.
Optional: Add beads or glitter along the yarn to give it a sparkling, magical effect.
Display and Play:
Hang the spider web yarn art in a window, on a wall, or from the ceiling for a spooky, fun display.
Kids can even “rescue” the spider from the web during imaginative play, adding a role-play element.
Cotton Ball Ghosts
There’s something magically tactile about cotton ball ghosts! This craft combines sensory exploration, creativity, and early learning all in one fun Halloween project. Children will love the fluffy texture, while practicing fine motor skills and imaginative thinking as they bring their ghost friends to life.

What You’ll Need:
Ghost-shaped paper cutouts (white cardstock or construction paper works best)
Cotton balls
Glue stick or liquid glue
Googly eyes or black paper for eyes
Marker or crayon for the mouth
Optional extras: glitter, stickers, or tissue paper for spooky flair
How to Make It:
Prepare the Ghost Shape:
Pre-cut ghost outlines from white paper for younger children, or let older kids cut their own shapes.
Shapes can be classic ghosts with wavy bottoms or imaginative silhouettes like tall, thin ghosts or round, plump ones.
Add the Cotton Balls:
Let children glue cotton balls over the ghost shape, covering the entire surface for a soft, fluffy effect.
Encourage them to experiment with texture — layering cotton for a puffier ghost or spreading it out for a lighter look.
Bring the Ghost to Life:
Glue on googly eyes or cut out black paper eyes and attach them.
Draw a smile, frown, or spooky expression with a marker.
Optional: add glitter, small tissue paper pieces, or stickers to make each ghost unique.
Display and Play:
Punch a small hole at the top and thread a string to hang ghosts from ceilings, doors, or windows.
Arrange multiple ghosts together for a “Ghost Parade” display.
Toilet Roll Bats
Turn ordinary toilet rolls into flying Halloween friends! This craft combines recycling, creativity, and fine motor skills in a simple, hands-on activity. Kids love painting, decorating, and watching their bats “come to life” as they hang from string — and parents will love that it promotes sustainability and imaginative play.

What You’ll Need:
Empty toilet paper rolls (or cardboard tubes from kitchen rolls)
Black paint, markers, or spray paint
Paper or cardstock for wings (black or dark gray)
Scissors (child-safe)
Glue stick or liquid glue
Googly eyes or stickers
String, ribbon, or thread for hanging
Optional extras: glitter, sequins, or small felt pieces for extra details
How to Make It:
Paint the Tube:
Begin by painting the cardboard roll black.
Let it dry completely before adding other decorations.
Younger children can use markers or crayons instead of paint for a quicker option.
Create the Wings:
Cut out bat wing shapes from black cardstock or construction paper.
Encourage children to experiment with different wing sizes and shapes — pointy, rounded, or scalloped edges.
Attach the Wings:
Glue the wings to the sides of the painted tube.
Optional: add a few folds or creases for a 3D effect.
Add the Face:
Glue on googly eyes or draw them with markers.
Draw a small mouth if desired — scary, silly, or smiling!
Hang Your Bat:
Punch a small hole at the top of the tube and thread string through to hang from ceilings, windows, or a Halloween display.
Watch as your bats “fly” in the breeze!
Magic Potion Jars
Get ready to brew some sparkle and wonder! This enchanting craft is a hit with little ones — part science experiment, part sensory magic, and all kinds of fun.

What You’ll Need:
Small clear jars or bottles with secure lids (plastic ones work best for little hands!)
Water
Glitter (fine and chunky for extra shimmer)
Food coloring (try spooky shades like purple, green, or orange)
Small spooky bits — plastic eyes, sequins, tiny spiders, or Halloween confetti
Optional: a few drops of baby oil or glycerin for slower, more “swirly” movement
How to Make It:
Prepare the Potion Base:Fill each jar about ¾ full with water. Add a few drops of food coloring — let the children mix and watch the color swirl!
Add the Magic Ingredients:Sprinkle in glitter and drop in your spooky bits — the more variety, the more mesmerizing the potion becomes. Encourage kids to describe what they’re adding: “I’m adding green glitter for witch power!”
Seal It Up Tight:Screw on the lid securely. (For extra safety, you can hot glue or tape the lid shut.)
Shake, Watch, and Wonder:Let children shake their potion bottles and watch the glitter and eyes swirl around. It’s calming, beautiful, and a little bit magical.
7. Spooky Eye Headbands
Get ready for some silly, spooky fashion fun! These Spooky Eye Headbands are a wonderful mix of creativity, laughter, and fine motor practice. Children will love designing their own wearable art — the sillier and spookier, the better!

What You’ll Need:
Strips of cardstock or construction paper (long enough to fit around a child’s head)
Paper eyes or sticker eyes 👀
Glue sticks or double-sided tape
Scissors (child-safe)
Coloring materials — crayons, markers, or paint sticks
Optional extras: glitter, feathers, tissue paper, pipe cleaners, stickers, sequins, or pom-poms
How to Make It:
Create the Headband Base:
Cut out a long strip of sturdy cardstock about 5 cm wide.
Wrap it loosely around each child’s head to measure, then tape or staple it to fit once decorated.
Prepare the Spooky Eyes:
Cut out paper “eyes” of different sizes and shapes — round, oval, monster-style, or mismatched.
Use sticker eyes or let kids draw their own funny or creepy designs!
Get Decorating:
Encourage children to decorate their headbands with eyes, colors, glitter, and fun extras.
Challenge them to make a “theme” — maybe a monster headband, witch’s crown, or alien eyes!
Show It Off:
Once the glue is dry, it’s time for the Spooky Fashion Parade!
Play Halloween music and let kids strut their stuff, showing off their creations to friends and family.
Q-Tip Skeletons
Turn a handful of Q-tips into a spooky skeleton masterpiece! This simple Halloween craft combines creativity, fine motor fun, and early math learning — all wrapped up in a giggly, hands-on experience that kids adore.

What You’ll Need:
Q-tips (cotton swabs) — around 10–15 per child
Black construction paper or cardstock (for that spooky contrast!)
Glue stick or liquid glue
Small paper skull cut-outs (you can draw them or print templates)
Scissors (child-safe)
Optional extras: googly eyes, white paint, cotton balls, or glow-in-the-dark stickers
How to Make It:
Prepare the Skeleton Base:
Give each child a sheet of black paper as their “skeleton stage.”
Talk about what bones they want their skeleton to have — arms, legs, ribs, or maybe even a tail for a “monster skeleton!”
Build the Bones:
Cut Q-tips into smaller pieces for shorter bones (arms, ribs, and fingers).
Arrange the Q-tips into a skeleton shape — one long spine down the middle, ribs across the sides, and smaller pieces for arms and legs.
Add the Skull:
Glue on the skull cut-out at the top.
Encourage kids to decorate the face — silly smiles, spooky expressions, or funny hats for a playful twist!
Glue It Down:
Once they’re happy with the layout, glue each Q-tip in place.
Let dry completely before lifting — or hang up for display!
Witch Hat Decorating Station
Get ready to stir up some creativity and a little bit of Halloween magic! This Witch Hat Decorating Station invites children to design, decorate, and express themselves through imaginative art. From sparkly sequins to pom-pom potions, it’s a wonderful mix of fine motor fun, sensory exploration, and self-expression — all wrapped up in a spooky-good time!

What You’ll Need:
🧺 Basic Materials:
Pre-cut witch hat shapes (black cardstock or felt works great!)
Glue sticks or non-toxic craft glue
Scissors (child-safe)
🎨 Decorative Add-Ons:
Stickers (stars, moons, bats, pumpkins)
Sequins, glitter, and gems for sparkle
Pom-poms and feathers for texture
Tissue paper or foil for extra flair
Colored markers, crayons, or paint sticks
Ribbons or pipe cleaners for hat bands or edges
🧢 Optional Extras:
Elastic string or headbands if you’d like the hats to be wearable
Tablecloths or trays for easy cleanup (because glitter loves to travel!)
How to Set It Up:
Create a Magical Workspace:
Cover tables with black or purple paper for a witchy atmosphere.
Organize materials into trays or bowls for easy access.
Add a cauldron or spooky music for a fun, immersive touch!
Decorate the Hat:
Encourage children to plan their design before gluing — will their hat be sparkly, spooky, or silly?
Let them add layers of decorations — stickers, glittery stars, spooky creatures — whatever their imagination conjures up!
Add the Finishing Touches:
Once dry, staple or tape elastic bands so children can wear their creations.
Set up a “Witch’s Mirror” station (a full-length mirror or reflective board) for kids to admire their look!
Pumpkin Patch Collage
The Pumpkin Patch Collage is a fun, hands-on Halloween craft that lets children create a vibrant, collaborative autumn scene. Using orange tissue paper for pumpkins and green strips for vines, kids can design, layer, and glue their pieces onto a large sheet to form a shared pumpkin patch. This activity encourages creativity, fine motor skills, color recognition, spatial awareness, and teamwork, while also offering opportunities for storytelling, sensory exploration, and imaginative play. Perfect for classrooms, playdates, or family crafting, it’s an engaging way to celebrate the season and make a memorable group display.

What You’ll Need:
Orange tissue paper squares
Green paper strips for vines
Glue sticks or craft glue
Large sheet of paper or poster board
Optional: markers, ribbon, cotton, or other decorative elements
How to Set It Up:
Scrunch or twist orange tissue squares into pumpkins.
Cut or curl green strips for vines and stems.
Glue pumpkins and vines onto a large shared sheet to create a pumpkin patch.
Add optional decorations like sun, clouds, or soil for extra detail.
Final Thoughts
Get ready for some spooky, hands-on fun! These ten Halloween art and craft DIY projects are perfect for keeping kids creatively engaged while celebrating the season. From handprint ghosts to pumpkin patch collages, each craft provides a wonderful opportunity for children to express themselves, explore textures, and develop essential skills like fine motor coordination, counting, and imaginative storytelling.
Gather your supplies, invite friends or siblings over, and let the Halloween crafting fun begin! These activities are ideal for playdates, classroom sessions, or family fun at home.
Visit The Child Unplugged — your go-to resource for playful, educational, and screen-free activities.


Comments